")

![[...] Avatar](http://storage.proboards.com/5444708/avatar/hQ9HUzxdvkxIuImttk1Q.jpg)
Post by [...] on Feb 4, 2015 14:11:42 GMT
Killing Floor 2 is a zombie survival shooter which came out in April 2015. I'll add interesting guides here in the first post so you can check it out whenever you want without searching through the whole thread. I'll try to add new stuff as soon as possible. If you have questions about the game feel free to ask me! 
Killing Floor 2 Early Access Trailer
]
Important note: KF2 is now in beta mode and Tripwire changed lots of things so all the guides are NOT updated! If there's someone who's really interested in these guides please let me know because I'm thinking about deleting this stuff since nobody gives a fuck anyway....
Which class has to do what?
Right now there are 4 classes - Commando, Support, Medic and Berzerker.
Commando: Shoot sirens, bloats and husks, they are annoying in the beginning and the commando can kill them easily. He's also good for killing lone and groups of ZED's.
Support: Don't waste your ammo for lone ZED's, only kill the groups. He's pretty strong against bigger ZED's like the Scrake, Fleshpound or Hans (AA-12).
Medic: Try to have an overview over the battlefield and give commands what the others need to do (like: fall back, push forward, Scrake from the right side....) Never stand on the front line unless you need to tank some damage. You should only take out lone ZED's in the beginning. Your lack of damage makes it hard to kill bigger things so you better concentrate on healing your team and having an overview.
Berzerker: Has a strong early game but gets weaker the longer the games goes on. You're the one who gets most kills in the beginning and shares the money after a few rounds since you only need your hammer and maybe a medic gun to be efficient. Don't forget that if you press your alternative attack key and move into one direction with w,a,s,d, you can do different moves - even while walking! Pretty overpowered to take out a whole group with one or two attacks Never stand still while attacking ZED's! You're the one who should engage on the bigger ZED's and most important - Hans (check out the Hans guide below if you don't know how to fight him). Your grenades disable their actions so if you throw a grenade for example in front on a Scrake you can easily kill him before he even starts charging on your team
Commando guide
Medic guide
Support guide
Berzerker guide (coming soon)
How to deal with Scrakes
How to deal with Fleshpounds
How to beat Hans

Killing Floor 2 Early Access Trailer
]
Important note: KF2 is now in beta mode and Tripwire changed lots of things so all the guides are NOT updated! If there's someone who's really interested in these guides please let me know because I'm thinking about deleting this stuff since nobody gives a fuck anyway....
Which class has to do what?
Right now there are 4 classes - Commando, Support, Medic and Berzerker.
Commando: Shoot sirens, bloats and husks, they are annoying in the beginning and the commando can kill them easily. He's also good for killing lone and groups of ZED's.
Support: Don't waste your ammo for lone ZED's, only kill the groups. He's pretty strong against bigger ZED's like the Scrake, Fleshpound or Hans (AA-12).
Medic: Try to have an overview over the battlefield and give commands what the others need to do (like: fall back, push forward, Scrake from the right side....) Never stand on the front line unless you need to tank some damage. You should only take out lone ZED's in the beginning. Your lack of damage makes it hard to kill bigger things so you better concentrate on healing your team and having an overview.
Berzerker: Has a strong early game but gets weaker the longer the games goes on. You're the one who gets most kills in the beginning and shares the money after a few rounds since you only need your hammer and maybe a medic gun to be efficient. Don't forget that if you press your alternative attack key and move into one direction with w,a,s,d, you can do different moves - even while walking! Pretty overpowered to take out a whole group with one or two attacks
Never stand still while attacking ZED's! You're the one who should engage on the bigger ZED's and most important - Hans (check out the Hans guide below if you don't know how to fight him). Your grenades disable their actions so if you throw a grenade for example in front on a Scrake you can easily kill him before he even starts charging on your team Commando guide
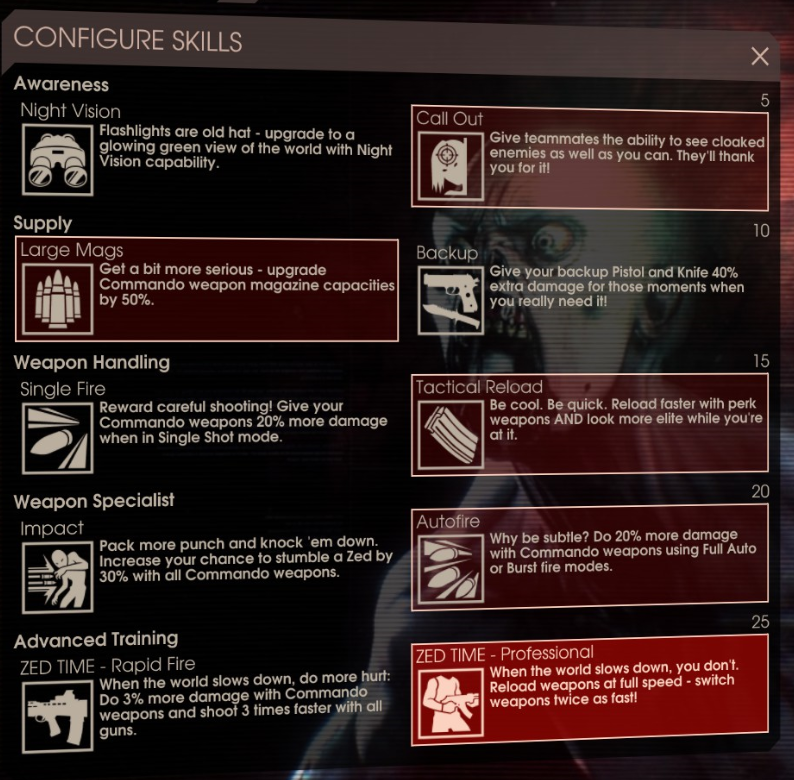
Level 5: "Night Vision" is pretty useless although the maps are pretty dark in general. Since the camp positions have to be chosen wisely it should never be a dark place which makes the skill unnecessary. "Call Out" is a must-have skill if you don't play alone (expect another Commando already uses it), the invisible bitches are not that hard to see but if you loose the overview in the fight it can be a pain in the ass to kill them effectively without using too much ammo.
Level 10: Another easy choice. As a Commando you often have to reload so it's best to use "Large Mags". "Backup" is completely useless since you should never run out of ammo from your main weapons and even if you have no more ammo (which happens a lot if you have to do all the work and your team is stupid ), the pistol damage won't save your ass. Using a knife is something I never recommend, especially on the higher difficulties. One mistake and you get grabbed and killed immediately so it's better not to use it ^.^
Level 15: This choice depends on how you like to play. I only use the single bullets mode for the start weapon you get as a Commando, the burst mode is mostly a waste of ammo. But if you use the single bullets mode for all the weapons - "Single Fire" is the right choice. I use "Tactical Reload" because I reload a lot and the speed is pretty useful. In Killing Floor, a second of waiting could decide a game against you so I highly recommend the reload skill expect you like to rape your mouse
Level 20: Easy choice for me, 20% extra damage with "Autofire" sounds good, doesn't it? I don't see a reason to pick "Impact" since from level 1 you can one-shot most of the ZED's (expect Siren, Bloat, Scrake, Fleshpound, Hans) so there is no need to make them stumble.
Level 25: I'm still not too sure about this one. "ZED TIME - Rapid Fire" sounds overpowered. You do more damage and shoot faster but you also run out of ammo faster and maybe don't hit as many ZED's as you would in the normal ZED TIME. I already mentioned how often I need to reload and that's why I picked "ZED TIME - Professional". When I played with the first skill last game I had problems using the buff since almost every time I needed to reload so it was useless for me. But if the ZED TIME starts and there are tons of ZED's in front of you it can be used for your advantage. Combined with "Tactical Reload" it's really strong.
Level 10: Another easy choice. As a Commando you often have to reload so it's best to use "Large Mags". "Backup" is completely useless since you should never run out of ammo from your main weapons and even if you have no more ammo (which happens a lot if you have to do all the work and your team is stupid
 ), the pistol damage won't save your ass. Using a knife is something I never recommend, especially on the higher difficulties. One mistake and you get grabbed and killed immediately so it's better not to use it ^.^
Level 15: This choice depends on how you like to play. I only use the single bullets mode for the start weapon you get as a Commando, the burst mode is mostly a waste of ammo. But if you use the single bullets mode for all the weapons - "Single Fire" is the right choice. I use "Tactical Reload" because I reload a lot and the speed is pretty useful. In Killing Floor, a second of waiting could decide a game against you so I highly recommend the reload skill expect you like to rape your mouse

Level 20: Easy choice for me, 20% extra damage with "Autofire" sounds good, doesn't it? I don't see a reason to pick "Impact" since from level 1 you can one-shot most of the ZED's (expect Siren, Bloat, Scrake, Fleshpound, Hans) so there is no need to make them stumble.
Level 25: I'm still not too sure about this one. "ZED TIME - Rapid Fire" sounds overpowered. You do more damage and shoot faster but you also run out of ammo faster and maybe don't hit as many ZED's as you would in the normal ZED TIME. I already mentioned how often I need to reload and that's why I picked "ZED TIME - Professional". When I played with the first skill last game I had problems using the buff since almost every time I needed to reload so it was useless for me. But if the ZED TIME starts and there are tons of ZED's in front of you it can be used for your advantage. Combined with "Tactical Reload" it's really strong.
Medic guide
The medic guide changes if you play solo or with a team but I'll exlain both sides
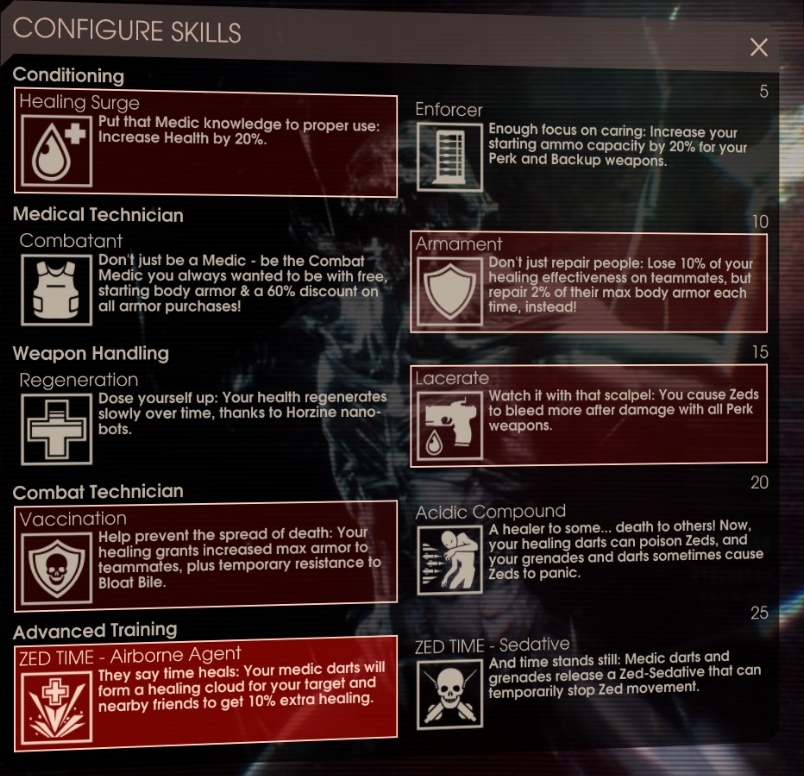
Level 5: Here you can choose however your playstyle is. I prefer to use "Healing Surge" so I can tank a bit more and I don't need to heal myself the whole time because I'm busy healing my team members. I think it's even useful if you play alone. Your choice, doesn't matter that much.
Level 10: I mostly use "Combatant" for every first round so I get a free armor. If I play alone I keep it sometimes but if I play with a team I always change it to "Armament". "Armament" sounds strong but its effectiveness only increases when you reach level 20 in combination with "Vaccination". It's still not that bad so I'd recommend using it.
Level 15: Easy choice. Again, "Regeneration" is the most useless skill in the game (so far). Every one or two seconds you get one HP which is literally nothing. The skill "Lacerate" helps the lack of damage medics have, to be more efficient.
Level 20: "Vaccination" in combination with "Armament" is just overpowered. One healing dart gives them 11 armor if you are level 25. It's stronger if you have a class which has extra amor since it gives you a percentage of your full armor. An easy way to get free armor - jump down from stairs or windows to get a bit hurt so the medic can keep healing you Use "Vaccination" if you play with a team. "Acidid Compound" is a skill you can use if you play alone but I don't really like it. You need several dart shots to slowly kill even the small ZED's so it's not useful IMO.
Level 25: "ZED TIME - Airborn Agent" has no use if there are no other players so the choice is pretty easy. I'd only use "ZED Time - Sedative" if I play alone but never with other people. Your task is to heal your team and not to control the ZED's!
Level 5: Here you can choose however your playstyle is. I prefer to use "Healing Surge" so I can tank a bit more and I don't need to heal myself the whole time because I'm busy healing my team members. I think it's even useful if you play alone. Your choice, doesn't matter that much.
Level 10: I mostly use "Combatant" for every first round so I get a free armor. If I play alone I keep it sometimes but if I play with a team I always change it to "Armament". "Armament" sounds strong but its effectiveness only increases when you reach level 20 in combination with "Vaccination". It's still not that bad so I'd recommend using it.
Level 15: Easy choice. Again, "Regeneration" is the most useless skill in the game (so far). Every one or two seconds you get one HP which is literally nothing. The skill "Lacerate" helps the lack of damage medics have, to be more efficient.
Level 20: "Vaccination" in combination with "Armament" is just overpowered. One healing dart gives them 11 armor if you are level 25. It's stronger if you have a class which has extra amor since it gives you a percentage of your full armor. An easy way to get free armor - jump down from stairs or windows to get a bit hurt so the medic can keep healing you
Use "Vaccination" if you play with a team. "Acidid Compound" is a skill you can use if you play alone but I don't really like it. You need several dart shots to slowly kill even the small ZED's so it's not useful IMO.Level 25: "ZED TIME - Airborn Agent" has no use if there are no other players so the choice is pretty easy. I'd only use "ZED Time - Sedative" if I play alone but never with other people. Your task is to heal your team and not to control the ZED's!
Support guide
Just like the medic, you can also play the support with different skills.
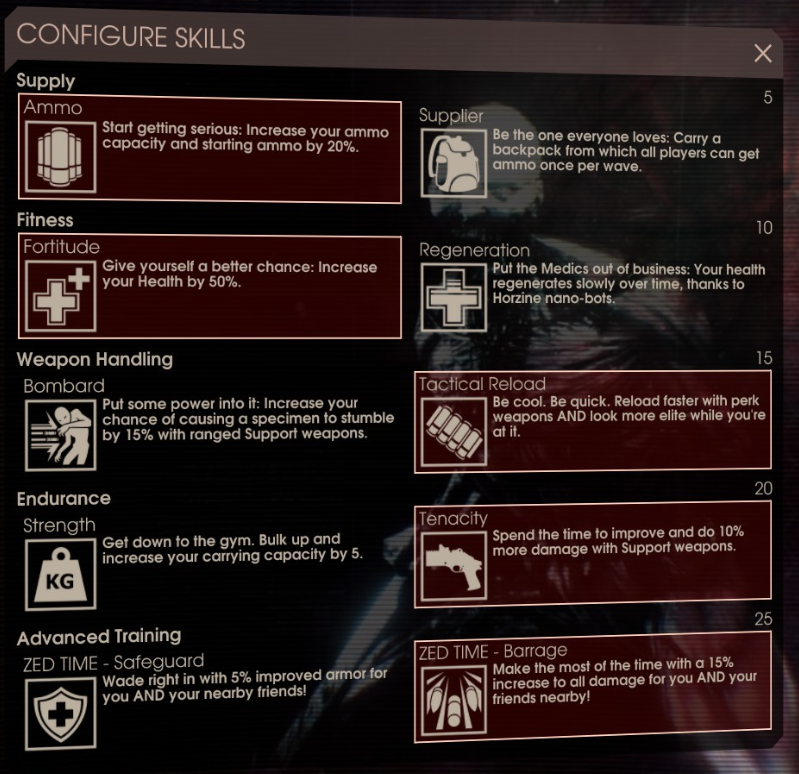
Level 5: I always use "Ammo" instead of "Supplier", just because people mostly don't even realize that you can give them ammo. "Supplier" has a way bigger impact for the game, think about how much ammo you can give your whole team in one round - it's the strongest level 5 perk so far! If you play alone "Ammo" is the right choice, obviously.
Level 10: Don't pick "Regeneration", never! Having 150 health is pretty strong so you better take "Fortitude".
Level 15: A faster reload speed will save your ass more times then making ZEDs stumble so pick "Tactical Reload" over "Bombard". Since you can kill most ZED's with one shot anyway it would be a waste. Fighting the bigger ones just needs enough team play or dodging skills so I see no need to pick "Bombard".
Level 20: Complicated. Let's start with "Tenacity". The best case szenario is that you have an AA12 and a Boomstick. Your AA12 fucks everything but you shouldn't waste your ammo for small ZED's, you'll need it for Scrakes and Fleshpounds. The Boomstick is pretty good against bigger groups but can also do solid single target damage. I use "Tenacity" if I can be sure that my team will survive and I don't have to clear all the ZEDs in the end - you don't have that much ammo with this option so think about taking the risk or not.
"Strength" gives you extra carrying capacity, the builds you can do if you only buy support weapon are:
Pump Action + Boomstick + AA12: Lots of ammo for very long rounds, or do you have no faith in your team members? Fact is, this option is really save if you like to shoot all the time but if you die the chances to get your AA12 back are lower.
M4 + AA12: You're the man! ZEDs shiver if they hear your name! It's similar with the "Tenacity" option and really risky if you ask me. The M4 is an awesome weapon but hard to handle in my opinion. The chances to get an high cost weapon back after your dead are better than the option above though.
I recommend testing all the different options, maybe you find your personal favorite or you're more the guy who likes to improvise
Level 25: Both of these skills affect your whole team but in my opinion "ZED TIME - Barrage" is way stronger than "ZED TIME - Safeguard". Imagine following situation: you and your team are getting overrun by ZEDs, a fleshpound is right in front of you and your team tries to get rid of him as soon as possible. What's stronger - 6 people doing 15% more damage or 6 people having 5% increased armor stats? If the armor buff would be 15% I'd think about it but right now damage just seems stronger (unless you're getting gangbanged by AOE like Siren screams).
Level 5: I always use "Ammo" instead of "Supplier", just because people mostly don't even realize that you can give them ammo. "Supplier" has a way bigger impact for the game, think about how much ammo you can give your whole team in one round - it's the strongest level 5 perk so far! If you play alone "Ammo" is the right choice, obviously.
Level 10: Don't pick "Regeneration", never! Having 150 health is pretty strong so you better take "Fortitude".
Level 15: A faster reload speed will save your ass more times then making ZEDs stumble so pick "Tactical Reload" over "Bombard". Since you can kill most ZED's with one shot anyway it would be a waste. Fighting the bigger ones just needs enough team play or dodging skills so I see no need to pick "Bombard".
Level 20: Complicated. Let's start with "Tenacity". The best case szenario is that you have an AA12 and a Boomstick. Your AA12 fucks everything but you shouldn't waste your ammo for small ZED's, you'll need it for Scrakes and Fleshpounds. The Boomstick is pretty good against bigger groups but can also do solid single target damage. I use "Tenacity" if I can be sure that my team will survive and I don't have to clear all the ZEDs in the end - you don't have that much ammo with this option so think about taking the risk or not.
"Strength" gives you extra carrying capacity, the builds you can do if you only buy support weapon are:
Pump Action + Boomstick + AA12: Lots of ammo for very long rounds, or do you have no faith in your team members?
Fact is, this option is really save if you like to shoot all the time but if you die the chances to get your AA12 back are lower.M4 + AA12: You're the man! ZEDs shiver if they hear your name!
It's similar with the "Tenacity" option and really risky if you ask me. The M4 is an awesome weapon but hard to handle in my opinion. The chances to get an high cost weapon back after your dead are better than the option above though.I recommend testing all the different options, maybe you find your personal favorite or you're more the guy who likes to improvise
Level 25: Both of these skills affect your whole team but in my opinion "ZED TIME - Barrage" is way stronger than "ZED TIME - Safeguard". Imagine following situation: you and your team are getting overrun by ZEDs, a fleshpound is right in front of you and your team tries to get rid of him as soon as possible. What's stronger - 6 people doing 15% more damage or 6 people having 5% increased armor stats? If the armor buff would be 15% I'd think about it but right now damage just seems stronger (unless you're getting gangbanged by AOE like Siren screams).
Berzerker guide (coming soon)
How to deal with Scrakes
The number one death reason in almost every game is the Scrake. Why? - because he's a tough bastard, does tons of damage and the most important part, most people don't know what to do when he charges on you. First of all, the Scrake is stupid, pretty stupid. As long you don't start shooting him you can easily avoid him until every other ZED is dead. The first thing you want to do whenever he spawns, don't panic! Kill the small ZED's, run away and regroup with your team until he or they are the only ones left. Check your ammo, the health of the team, if everyone is ready - communication is important in KF2! The Scrake will only charge on your team if he gets too much damage, it scales with the difficulty you play with. Should start with 50% health on the lowest and with 90% health on the highest difficulty. Whenever he's mad he'll never stop charging on you until he or your team is dead (not like in KF1 where he only raged for a few seconds before calming down again!). If he kills a team member you have a few seconds before he continues charging the next one because he swings his chainsaw around and laughs at your failure To avoid your death you just need to do one thing. Like I said before, he's stupid so when he charges on you (make sure to have enough space to react) just sprint around him, having close contact with his body. I prefer to sprint around his left side because the chances of getting hit by his chainsaw are smaller since he has it on his right hand! Now you have two options:
1) after you dodged him you wait until he charges again or
2) you keep running around him after you dodge his first attack (not too fast!). He'll be confused and keeps turning around but won't attack you.... because he's STUPID ^.^
Important note: reloading is risky with the first option since you need a bit time until you can sprint again so I'd only reload if you use option two or if you use a faster reload perk (still risky). Also don't rage several Scrakes at once, you'll get rekt
Do it like that and you can easily kill Scrakes by your own
To avoid your death you just need to do one thing. Like I said before, he's stupid so when he charges on you (make sure to have enough space to react) just sprint around him, having close contact with his body. I prefer to sprint around his left side because the chances of getting hit by his chainsaw are smaller since he has it on his right hand! Now you have two options:1) after you dodged him you wait until he charges again or
2) you keep running around him after you dodge his first attack (not too fast!). He'll be confused and keeps turning around but won't attack you.... because he's STUPID ^.^
Important note: reloading is risky with the first option since you need a bit time until you can sprint again so I'd only reload if you use option two or if you use a faster reload perk (still risky). Also don't rage several Scrakes at once, you'll get rekt
Do it like that and you can easily kill Scrakes by your own
How to deal with Fleshpounds
The Fleshpound is like in Killing Floor 1. In his yellow mode, he walks around slowly but in his rage mode (red) he charges on your team. The rage time lasts 10 seconds and you have (I think) a 10 second break until he rages again. He's a tough sunofabitch and only vulnerable against grenades. There are two options you have if he spawns:
1) there are almost no more ZED's and you have much space or much time (until the other ZED's join him) to fight him. That's the dream option! All team members should be grouped and spam grenades. There's no sharpshooter/demolition perk yet so the support is your king here (AA-12 ftw)!
2) he spawns and everything is full of ZED's. If that's the case - run!!! Stay grouped and shoot your way through the ZED's. Never stop running until you have option 1!
That's it! There's no real way of how you can dodge him like the Scrake so you better trust your medic/s to save your ass
How to beat Hans
Hans is the end boss and spawns after the last round (5/4, 8/7, 11/10). First of all I'll explain what kind of weapons he uses.
1) 2 assault rifles: a few shots are enough to loose your whole armor and your life
2) melee attacks
3) He loves gas.
3.1 Gas grenades: he throws several grenades in only one direction or in every direction, be careful! After a short time they explode and a few gas fields will make your life harder (similar to the medic grenade but they don't hurt). DON'T RUN THROUGH THEM UNLESS THERE'S NO OTHER WAY! (you are dead before you even know it)
3.2 Gas AOE attack (area of effect): if too many players stand next to Hans he'll do a big AOE gas explosion which literally oneshots you.
4) Frag grenades: Same like the gas grenades, don't underestimate the damage!
5) Smoke grenades in combination with drain: The grenades don't damage you but you'll loose some vision. Hans will charge on one of your team members and drain life of him. The person who gets drained can't die because of that!
The best setup is in my opinion (with 6 players): 1 Berzerker, 1 Commando, 2 Supports, 2 Medics (if there're more perks it can change of course).
Hans has 4 phases: green, yellow, red, red and pissed (you can see the colour on his belly). In his green phase he walks slowly around, throwing mainly gas grenades and shooting with his assault rifles. When his life goes to 35% he'll throw smoke grenades and hunt one of your members to drain his life. Don't shoot him while he's hunting because after the drain he'll have 100% health again. While draining don't shoot him too, he gets a 85% immunity to all kinds of weapons so you better heal your team mate! If he has finished the drain he'll be in the yellow phase. Now he can throw frag grenades too and the amount of grenades he throws are higher. Again, let him drain when he starts his hunting. In his red phase he'll have even more grenades and starts being way more aggressive (higher movement speed plus more melee attacks). After he drained the third and last time things will be tough. He won't change his colour but he's really pissed which means he's going berzerk and keeps sprinting and chasing after one team member. He'll switch between trying to hit you with melee attacks and throwing frag and gas grenades. If many of your team members are alive and you have the balls just face him and shoot him into pieces. If you are alone - don't give up! Use the times where he throws grenades to heal yourself, run or shoot him (be careful with the shooting because there's a small delay before you can sprint!).
From my experience the best way how to kill him is if your berzerker "dances" around him and blocks the damage while your team keeps shooting him, the AA12 is the best weapon for that! You want to get him out of his green phase as soon as possible because that's when he uses his assault rifles the most! Don't hesitate and charge on him before he kills your team in a matter of seconds. But of course this doesn't mean to go all in all the time - you should know the difference between "hunting Hans" and "letting him hunt you", otherwise you're dead before you know it!
1) 2 assault rifles: a few shots are enough to loose your whole armor and your life
2) melee attacks
3) He loves gas.
3.1 Gas grenades: he throws several grenades in only one direction or in every direction, be careful! After a short time they explode and a few gas fields will make your life harder (similar to the medic grenade but they don't hurt). DON'T RUN THROUGH THEM UNLESS THERE'S NO OTHER WAY! (you are dead before you even know it)
3.2 Gas AOE attack (area of effect): if too many players stand next to Hans he'll do a big AOE gas explosion which literally oneshots you.
4) Frag grenades: Same like the gas grenades, don't underestimate the damage!
5) Smoke grenades in combination with drain: The grenades don't damage you but you'll loose some vision. Hans will charge on one of your team members and drain life of him. The person who gets drained can't die because of that!
The best setup is in my opinion (with 6 players): 1 Berzerker, 1 Commando, 2 Supports, 2 Medics (if there're more perks it can change of course).
Hans has 4 phases: green, yellow, red, red and pissed
(you can see the colour on his belly). In his green phase he walks slowly around, throwing mainly gas grenades and shooting with his assault rifles. When his life goes to 35% he'll throw smoke grenades and hunt one of your members to drain his life. Don't shoot him while he's hunting because after the drain he'll have 100% health again. While draining don't shoot him too, he gets a 85% immunity to all kinds of weapons so you better heal your team mate! If he has finished the drain he'll be in the yellow phase. Now he can throw frag grenades too and the amount of grenades he throws are higher. Again, let him drain when he starts his hunting. In his red phase he'll have even more grenades and starts being way more aggressive (higher movement speed plus more melee attacks). After he drained the third and last time things will be tough. He won't change his colour but he's really pissed which means he's going berzerk and keeps sprinting and chasing after one team member. He'll switch between trying to hit you with melee attacks and throwing frag and gas grenades. If many of your team members are alive and you have the balls just face him and shoot him into pieces. If you are alone - don't give up! Use the times where he throws grenades to heal yourself, run or shoot him (be careful with the shooting because there's a small delay before you can sprint!).From my experience the best way how to kill him is if your berzerker "dances" around him and blocks the damage while your team keeps shooting him, the AA12 is the best weapon for that! You want to get him out of his green phase as soon as possible because that's when he uses his assault rifles the most! Don't hesitate and charge on him before he kills your team in a matter of seconds. But of course this doesn't mean to go all in all the time - you should know the difference between "hunting Hans" and "letting him hunt you", otherwise you're dead before you know it!


 Happy 10th Anniversary to The Walking Dead Game